VPN Connections to TAMUQ Network
Windows & Mac OS X
The Cisco AnyConnect VPN client is officially supported -- and generally easy to install and use -- on all recent versions of the Windows operating system, and on Mac OS X. These are our recommended platforms for remote connections to the TAMUQ network, and ultimately to our HPC systems.
It is important to remind our users that establishing a VPN connection to TAMUQ is the first step in connecting to our systems. Once a VPN connection is active, you must still initiate an SSH connection to the HPC system of choice (e.g. raad2) in order to actually log in. On Windows this can be done using a program like MobaXterm, and on OS X one may issue an SSH command from a terminal window (e.g. "ssh raad2.qatar.tamu.edu").
If you are using a Windows or Mac system, further guidance on how to install and use the VPN client can be found on the website of our IT department:
VPN Connection to TAMUQ Network
Just note that when attempting to establish the connection in the AnyConnect application window, use the "Split" option for the "Group" field if you are a TAMUQ user, and use the "HPC" option if you are an external (non-TAMUQ) user. Also note that you will be using your domain credentials for this service. Remember, these are different from your HPC Cluster credentials; your username here should be of the form firstname.lastname.
Supported Linux Distributions
CentOS 6
CentOS 7
Ubuntu 12.4
Ubuntu 14.4
Ubuntu 16.4
Please note that these are the Linux distributions officially supported by Cisco for their AnyConnect VPN client. The client is likely to work on other linux distributions too, but if problems are encountered, our capacity to troubleshoot them may be limited. For this reason, we recommend that our HPC users adopt one of the above distributions for their local system (that, is if they require a linux system -- otherwise, Windows systems work just fine).
- In your browser, go to https://connect.qatar.tamu.edu
- In the login box, enter your domain credentials. Remember, these are different from your HPC Cluster credentials; your username should be of the form firstname.lastname.
- HPC means only network traffic destined for TAMUQ HPC systems will go through the VPN tunnel and you will not be able to reach anything else on the TAMUQ network. Your other traffic (e.g. web browsing, email, etc.) will still travel via your local network, like it normally does. External (non-TAMUQ) users must select this option to connect successfully.
- Split means only network traffic destined for TAMUQ systems will go through the VPN tunnel. Other traffic (e.g. web browsing, email, etc.) will still travel via your local network, like it normally does. You will also have access to campus resources other than the HPC systems (e.g marhaba, network drives, etc.). This option is only valid for TAMUQ users.
- All means ALL your network traffic will be tunneled through the TAMUQ network, and may potentially slow down activities like web browsing. You will also have access to campus resources other than the HPC systems (e.g marhaba, network drives, etc.). This option is only valid for TAMUQ users. (The screenshot below shows an old -- now deprecated -- group name. Please ignore it.)
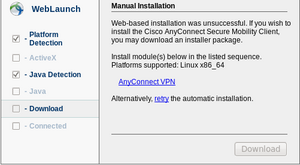
- Once you log in, the site will attempt to start the client installer automatically. If that works... great. Otherwise, you will be granted the option to install the client manually, as in the screenshot below:
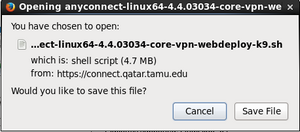
- Click on the "AnyConnect VPN" link on the "Manual Installation" screen (as seen above), and then click "Save File" in the dialogue window that opens up (as seen below) so that you can save the client in your Downloads folder.
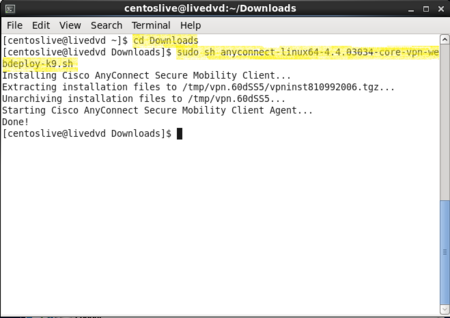
- Open the Terminal application and type the following sequence of commands at the command line (of course "nameofthefile.sh" should be the real name of the client installer downloaded earlier):
- An example screenshot of the previous step might look something like this:
- Locate the "Cisco AnyConnect Secure Mobility Client" application under Applications --> Internet, and launch it. For some reason if the menu item fails to launch the client, open a terminal and try to launch the client manually by typing
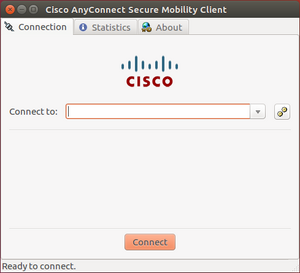
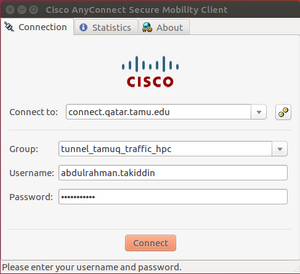
/opt/cisco/anyconnect/bin/vpnui. If this does not work, see the troubleshooting section below. - You should see the following window. In the "Connect to" field, type "connect.qatar.tamu.edu" as follows:
- Next, select "HPC" for the "Group" field if you are a non-TAMUQ user -- or select "Split" if you are a TAMUQ user -- then enter your domain credentials in the final two fields. (The screenshot below shows an old -- now deprecated -- group name. Please ignore it.)
- Since Oct 1, 2020 the Anyconnect client relies on 2-factor authentication (2FA) meaning that if you entered the correct credentials, your 2FA enrolled smartphone should receive a notification via the "Duo" app. This notification is in effect an approval request, and you need to approve it. For more information on Duo 2FA, please see this.
- Once you approve the request from Duo, you will be connected over VPN, and ready to use ssh from a command prompt to log in to the intended HPC system.
Installation
-
For the "GROUP" field...
$ cd Downloads
$ sudo sh nameofthefile.sh
How to Connect


Troubleshooting
Problem: Unable to launch Cicso client from desktop menu system and unable to launch it from the command line.
Solution: A software dependency for the Cisco client may be missing from your system. Open Terminal and run the following:
cd /opt/cisco/anyconnect/bin
Then
./vpnui
If you see an error related to libpangox, run the following command
sudo apt install libpangox-1.0-0
Then run the command again:
./vpnui
You should now be able to launch the Cicso client.
Other Linux Distributions (unsupported)
OpenSUSE Tumbleweed
OpenSUSE Leap
The Cisco VPN client is not officially supported on Linux distributions other than the ones mentioned in the previous section. However, on these distributions we have found that VPN can be made to work with the procedure we outline below. This may also work with other SuSE based distributions but we have not tested it. If you are not comfortable enough with Linux (e.g. installing software, working with the command line interface, etc.) and you encounter problems, you are likely to have to consult a local Linux expert for help. Alternatively, you may simply have to adopt one of the platforms where the Cisco client is officially supported. Unfortunately, the set of Linux distributions on offer is too diverse for us to be able to effectively support all those favored by the entire user base.
- Open the Terminal application and type the following command at the command line (this will prompt you for your password):
- To establish a connection, enter the following command (type the string "Split" after the forward slash if you are a TAMUQ user, or "HPC" if you are an external (non-TAMUQ) user):
- When prompted, enter your domain username and password. Then, respond to the 2FA notification from the Duo app installed on your smartphone with an approve action. (For more information on Duo 2FA, please see this.) You should now be connected over VPN. We recommend you minimize this particular terminal window for the duration of your session. In order to actually log in to one of the HPC systems, you will now have to issue the appropriate SSH command in a separate terminal window (e.g. "ssh raad2.qatar.tamu.edu"). Once you are finished with your session, logout from the HPC system, maximize your VPN window and issue a control-C keystroke therein. That will gracefully shut down the VPN connection.
Installation
$ sudo zypper install openconnect
How to Connect
$ openconnect connect.qatar.tamu.edu/HPC
